How to cut men trouser/pant in less than 15min step by step
General Rule of Thumb (2 Front Panels)
PreReq
1. Fold the fabric right side in and wrong side out
Marking from top of Waist to bottom of Ankle
- Edge Base Line - Measure 1” from the edge and draw a straight line
- Pants Length - Measure Length 35” away from the edge line and draw a straight line
- Pants Fold - Measure 2” for the Folding from the length line and draw a straight line
- Crutch Length - Get the Crutch – (Waist Measurement /4) + 1” or 1.5” or 2”
- Example 29/4 = 7 ¼” + 1.5” =8.7” (round up)
- (based on type of fit, kids add 1” young man 1.5” adult 2”)
- Measure 8.7” from base line and draw a straight line for the Crutch Line
- Method 2 for Crutch depth
- Hip - Divide the hip by 4 and add 1.5”
- (Waist /4) + 1"
- Example if
- Length is 40"to 45", then crutch depth is 9.5"
- Length is 35"to 39", then crutch depth is 9"
- Length is 32" to 34" then crutch depth is 8.5"
- Find the Knee = (Crutch Line – Ankle hem line) /2 and add 2” upwards and a straight line
Marking across from Center Line
- Waist - Waist 28/4 + 1.5 for Zipper =9.5”
- Center Line - Find Center line = Crutch /2 = 11.5” /2 =5.7” - Draw a straight line
- Mark the Hem line from Center line 13 /2 = 6.5 /2 =3.1/4”
- Mark the Knee line from Center line 16” /2 =8”
- Draw the line connecting the edges and cut

General Rule of Thumb (2 Rear or Back Panels)
- Waist Line - Measure 1” from above waist line for back panels and draw a straight line
- Add 1.5" for darts and seam allowances
- Center of darts is your back pocket
- Crutch Line mark 3" up and at 90 degrees angle mark 1.5" at 45 degrees and draw a curve line
- Add 1.5" to the crutch line and 2.5" to the front of the crutch line on the back panels
- The out-seam cut identical as front panel - only the in-seam you add 2" to the edge for ankle, knee


- Draw a reference straight line 1" away from the width raw edge
- Measure the Length 35" from line and draw a straight line
- Measure 2" for the Folding from the length line and draw a straight line
- Crutch Hight Formula = (Waist Measurement /4) + 1” or 1.5” or 2”
- Example 29/4 = 7 ¼” + 1.5” =8.7”
- (based on type of fit, kids add 1” young man 1.5” adult 2”)
- Measure 8.7” from base line and draw a straight line for the Crutch Line
- Divide the hip by 4 and add 1.5”
- Waist 28/4 + 1.5 for Zipper =9.5”
- Center Line Formula = Crutch /2
- Example 11.5” /2 = 5.7” - Draw a straight line
- Knee Formula = (Crutch Line – Ankle hem line) /2 and add 2” upwards and a straight line
- Mark the Hem line from Center line 13 /2 = 6.5 /2 =3.1/4”
- Mark the Knee line from Center line 16” /2 =8”
- Draw the line connecting the edges and cut
Marking and Cutting the 2 Front Panels
- Fold Fabric width - Right side in and Wrong side out. The width is longest measurement which is the thigh /2 + 1"
- Draw a straight line on the width corner edge of the fabric (it will be the starting line or the Waist Line

- From the Length measure 1" and mark it with a chalk

- Measure 11" from the waist base line which is the Crutch

- Measure 1.5" off the Waist for the Waist band, so you are subtracting it and mark the length

- Mark the Length of the pants which is 40" or the ankle measurement

- Mark the an additional 2" for the Hem making it 42"

- Mark it on the edge parallel to the center measurement

- Use a Straight Edge to Draw a straight line connecting the 2 lines

- Mark 2" Inwards from the edge on the Ankle lines

- From there measure the ankle /2 which is 7.5" . The ankle measurement is 15"

- Go up and measure the Knee Length with is 22" from the waste line

- Mark the Kneel Length on the coroner also and Draw a straight line of the Knee Length

- From the Knee length edge measure off 1.5"

- Then transfer the length of the crutch to the other side and draw a straight line

- Then mark it and draw a straight line

- Take the Waist circumference and divide it by 4 mark both the Waist Line and the Crutch Line

- Mark the thigh circumference /2

- Draw the curve line

- Use the Curve Rule to draw the crutch line
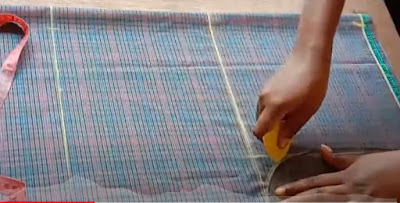
- Checkpoint - You have marked out the crutch outline

- Draw a straight line from the Waist where you take out 1" to the crutch line - this is to enable the pants fits perfectly.

- Draw a line connecting the Crutch to the Knee line

- Measure and draw the knee circumference /2 which is 22"/2 is 11"

- Mark the Knee measurement

- Connect the Knee measurement to the Crutch

- With a long rule connect the knee with the ankle

- Repeat the process on the backend

- Checkpoint - The Front panel is ready

- Drop the waist line by 1" and join the slant line

- Ready to cut Keep the crutch material for the Zipper

- zipper


Reference:
https://www.youtube.com/watch?v=LLnqV_k2vNQ


No comments:
Post a Comment